Seeing those dark, greasy smudges on your walls is alarming. And for good reason. Soot is more than just an ugly stain; it’s a warning sign about your indoor air quality. Those tiny carbon particles can be inhaled, posing a risk to your family’s health. But before you grab a wet rag, stop. Wiping it the wrong way can smear the mess and release more particles into the air. We’ll show you how to tackle the problem safely, from the best cleaning techniques to choosing an effective soot cleaner for walls that gets the job done right.
Key Takeaways
- Start with a dry-cleaning sponge, not water: Using water first will smear oily soot and permanently set the stain. Always lift loose particles with a specialized soot sponge or a vacuum before attempting to wash the wall with any liquid cleaner.
- Focus on prevention to keep soot from returning: Identify and address the source of incomplete burning, such as long candle wicks or a dirty fireplace. Improving your home’s ventilation and scheduling regular appliance maintenance are the best ways to stop soot buildup.
- Know when a job is too big for DIY: Call a professional restoration service if soot damage is widespread, a smoky smell lingers after cleaning, or your efforts are ineffective. Experts have the right tools to safely remove extensive soot and completely neutralize odors.
What Is Soot and Why Is It On My Walls?
If you’ve noticed a stubborn, black, powdery film on your walls, you’re likely dealing with soot. Seeing it can be unsettling, and you’re probably wondering where it came from and how to get rid of it. Soot is more than just a messy stain; it’s a signal that something in your home isn’t burning cleanly. It’s the byproduct of incomplete combustion, and its oily, sticky nature makes it tricky to clean without smearing it further.
The good news is that you’re in the right place to figure out what to do next. Understanding the source of the soot is the first step toward cleaning it up and preventing it from coming back. Whether it’s from a cozy evening by the fireplace, a few too many scented candles, or a cooking experiment gone wrong, soot can appear unexpectedly. Before you reach for a wet rag (which can actually make things worse), let’s break down where soot comes from and why it’s so important to handle it with care.
Understanding Soot: Causes and Properties
To effectively clean soot, it helps to know exactly what you’re up against. Soot isn’t like regular household dust or dirt; it’s an oily, acidic residue that behaves in a very specific way. Its unique properties are the reason why a simple wet cloth often creates a bigger mess and why the right cleaning technique is so important. By understanding what causes soot and how it interacts with surfaces, you can tackle the problem at its source and choose a cleaning method that actually works, ensuring those dark stains disappear for good.
What Causes Soot Buildup?
Soot is the result of incomplete combustion, which happens when fuels like wood, oil, gas, or even candle wax don’t burn completely due to a lack of oxygen. This process creates tiny, lightweight carbon particles that float through the air and eventually settle on surfaces, including your walls and ceilings. Common culprits in a home include poorly ventilated fireplaces, furnaces in need of a tune-up, and even scented paraffin candles with untrimmed wicks. A small kitchen fire or frequently burning food can also produce a surprising amount of soot, leaving a greasy film that requires careful cleaning to protect your home’s air quality.
The Corrosive Nature of Soot and “Ghosting”
Beyond being an eyesore, soot is acidic and can cause long-term damage to the surfaces it coats. Over time, it can discolor paint, stain wallpaper, and even corrode metal. Because the particles are so fine, they can penetrate porous materials and leave behind a stubborn smoky odor. You might also notice a strange phenomenon known as “ghosting,” where soot creates faint, web-like patterns on walls, often outlining the studs where the surface temperature is slightly different. This is why a professional approach is often necessary for significant fire and smoke damage, as experts can neutralize the acidic residue and eliminate lingering smells completely.
Identifying Common Soot Sources in Your Home
Soot is a fine, black powder made of tiny carbon particles left over from burning fuel. In your home, some of the most common sources are everyday comforts. A crackling fireplace can release soot, especially if the chimney or flue isn’t clear. Scented candles are another frequent culprit; when the wax burns too fast for the wick, it causes an incomplete burn that releases those unburned particles into the air. You might also find soot buildup in your kitchen from cooking, particularly with gas stoves or after an oven mishap, especially if your ventilation isn’t great.
Candles, Fireplaces, and Beyond
While candles and fireplaces create a cozy atmosphere, they are often the primary culprits behind soot stains. Not all candles are created equal; some, like those made from paraffin wax, produce more soot than others. To minimize buildup, consider switching to beeswax or soy wax candles and always trim the wick before lighting it. This simple step ensures a cleaner burn and reduces the amount of carbon particles released into the air. These particles are tiny enough to be inhaled, which can irritate your lungs, so taking small preventative measures makes a big difference for your home’s air quality and cleanliness.
Fireplaces are another major source, especially if they aren’t used or maintained correctly. Burning wet wood or having a blocked chimney prevents proper ventilation, leading to incomplete combustion and significant soot production. This residue doesn’t just stain your walls; it can also signal a more serious fire hazard. If you notice heavy soot from your fireplace, it’s a good idea to have it inspected. Persistent soot and smoke odors are often signs that you need professional fire and smoke damage restoration to ensure your home is safe and the air is clean.
The Hidden Health Risks of Soot Stains
Beyond the unsightly stains, soot poses a genuine risk to your health. Those tiny black particles are small enough to be inhaled deep into your lungs, which can cause respiratory irritation and worsen conditions like asthma. Soot is primarily carbon, but it can also carry acidic and toxic compounds. This is why tackling a major soot problem yourself can be risky. Without the right safety gear and cleaning methods, you could expose yourself and your family to these harmful particles. For significant soot damage, especially after a house fire, calling a fire damage restoration team is the safest and most effective choice.
Inhaling Harmful Particles and Potential Toxins
The biggest concern with soot isn’t the stain itself, but what’s inside it. These tiny black particles are so fine that they easily become airborne and can be inhaled deep into your lungs. This can lead to immediate respiratory irritation, coughing, and shortness of breath, and it can be especially dangerous for children, the elderly, and anyone with asthma. Soot is mostly carbon, but it often carries acidic compounds and other toxins from whatever material was burned. When you try to clean it, you can accidentally release these harmful particles back into your home’s air, making the problem worse.
This is why handling soot requires more than just a sponge and some soap. For anything beyond a small, isolated patch, it’s much safer to bring in professionals. A team that specializes in fire and smoke damage restoration has the right equipment, like HEPA vacuums and air scrubbers, to remove soot safely without contaminating your living space. They can ensure the air you and your family breathe is clean and free from these hidden dangers.
The Best Soot Cleaner for Walls: DIY vs. Store-Bought
When you’re facing soot-stained walls, reaching for the right cleaner can make all the difference between a successful cleanup and a bigger, smeared mess. The best approach often involves a multi-step process, starting with gentle, dry methods before moving on to liquid cleaners. The right product for you will depend on how much soot you’re dealing with and the type of surface you’re cleaning.
Before you grab a wet rag (and please don’t!), it’s important to understand your options. From specialized sponges designed specifically for soot to powerful store-bought chemicals and even simple DIY solutions you can mix up at home, there’s a cleaner for every situation. Let’s walk through the best tools for the job so you can get your walls looking fresh again.
Your First Step: The Dry-Cleaning Sponge
Your first line of defense against soot should always be a dry-cleaning sponge. Also known as a soot sponge, this tool is made from vulcanized natural rubber that works wonders at lifting loose soot particles off surfaces without using any water or chemicals. This is the most critical step because adding liquid too early will just smear the fine soot particles, embedding them deeper into the paint and creating a much tougher stain to remove.
To use it, simply wipe the sponge in straight, parallel strokes across the wall. As the sponge picks up soot, its surface will get dirty. Just slice off the used layer with a knife to reveal a fresh surface and keep going. Think of this as the essential prep work before you tackle any remaining stains with a liquid cleaner.
Other Dry-Cleaning Tools to Try
If you don’t have a soot sponge handy, don’t worry—you likely have other tools that can help with the initial dry-cleaning step. A vacuum cleaner with a soft brush attachment is an excellent option for lifting away loose soot without direct pressure. Just be sure to hold the nozzle slightly away from the wall so the bristles gently whisk the particles into the vacuum’s suction stream. Another effective tool is a clean, dry microfiber cloth. Unlike regular rags, microfiber is designed to grab and hold onto fine particles. Gently wipe the wall in one direction with light, overlapping strokes to lift the soot. These methods are great for minor buildup, but for widespread issues, the cleanup is more complex. Safely addressing extensive fire and smoke damage often requires professional techniques to ensure all harmful residues are fully removed.
Effective Store-Bought Soot Removers
After you’ve removed as much loose soot as possible with a dry sponge, you might still see some greasy stains left behind. This is where a dedicated cleaning product comes in handy. For particularly stubborn soot, a solution containing Trisodium Phosphate (TSP) is a highly effective degreaser that can cut through tough residue. You can find it at most hardware stores, but be sure to follow the safety instructions carefully, as it’s a powerful chemical that requires gloves and good ventilation.
If you’re dealing with extensive staining from a puffback or fire, the job may require more than a store-bought solution. In these cases, professional fire and smoke damage restoration ensures the soot is removed safely and completely without damaging your walls.
Types of Commercial Soot Cleaners
Beyond powerful chemicals like TSP, you can find a whole range of products specifically formulated for smoke and soot damage at most home improvement stores. These cleaners are designed to break down the oily, greasy film that soot leaves behind. Online marketplaces also offer a huge variety of soot removers, available in different forms like sprays, foams, and gels, giving you plenty of options to choose from. One popular household tool to be cautious with is the Magic Eraser. While it can be effective, it’s also abrasive and can easily damage or strip the finish from your paint, leaving behind noticeable shiny spots. If you decide to try it, always test it on a small, hidden area first to see how your wall reacts.
DIY Soot Cleaners That Actually Work
For lighter soot stains, like those from a candle burning too close to a wall, you may not need a heavy-duty chemical cleaner. A few common household items can work surprisingly well. One of the most effective DIY options is a simple mixture of warm water and a good degreasing dish soap. The soap helps break down the greasy nature of soot, allowing you to gently wipe it away.
Another great option is to create a baking soda paste. Mix baking soda with a small amount of water until it forms a paste, apply it to the stain, and let it sit for a few minutes before gently scrubbing with a soft cloth. Always remember to test any DIY solution on a small, hidden spot first to make sure it doesn’t affect your paint.
A Simple Vinegar and Water Solution
Another powerful DIY cleaner you likely already have in your pantry is white vinegar. Its natural acidity makes it excellent at cutting through the greasy, oily film that soot often leaves behind on walls. To create this simple solution, just combine equal parts white vinegar and warm water in a clean spray bottle. Lightly mist the stained area, being careful not to oversaturate the wall, which could cause drips or damage. Let the solution sit for about five to ten minutes. This dwell time is key, as it allows the vinegar to effectively break down the stubborn soot particles, making them much easier to wipe away without smearing.
Once the solution has had time to work, gently wipe the stain with a soft cloth or sponge, using a light touch to avoid damaging the paint. After cleaning, rinse the area with a separate cloth dampened with clean water, and then pat it dry. A great bonus of using vinegar is that it also helps neutralize lingering odors, leaving the room feeling fresher. As with any cleaning solution, it’s always a good idea to test it on a small, hidden spot first to make sure it agrees with your wall’s finish. While this method is great for minor stains, widespread soot from a furnace puffback or fire requires a more robust approach from a professional smoke damage restoration team.
How to Safely Clean Soot From Walls: A Step-by-Step Guide
Once you have your supplies, you’re ready to tackle the soot. But before you start scrubbing, it’s important to follow a specific process. Cleaning soot isn’t like wiping down a dusty shelf; a methodical approach will prevent you from accidentally making the stains worse or damaging your walls. Following these steps will give you the best shot at restoring your walls without calling in a professional.
Step 1: Gather Your Safety Gear
Before you touch the wall, protect yourself. Soot contains fine particles that are harmful if inhaled, and cleaning agents can irritate your skin and eyes. Always wear safety glasses, a mask, rubber gloves, and old clothes you don’t mind getting stained. This isn’t just about staying clean; it’s about safety. Taking these precautions is a critical first step in any fire damage restoration project.
Essential Protective Equipment
Your safety kit should include a few non-negotiable items: an N-95 dust mask, safety glasses or goggles, heavy-duty rubber gloves, and a long-sleeved shirt and pants. The mask is crucial for preventing you from breathing in the fine soot particles, which can cause respiratory irritation. Goggles will shield your eyes from both airborne soot and any cleaning solutions you use later on. Since soot is often oily and cleaning agents can be harsh, gloves are essential to protect your skin. This level of protection is standard for any professional fire damage restoration team for a reason—it keeps you safe from hidden hazards while you work.
Step 2: Don’t Skip the Spot Test
Before applying any cleaning solution to the entire wall, it’s smart to do a spot test in an inconspicuous area, like behind furniture. Apply a small amount of your chosen cleaner, let it sit, then wipe it away. This quick check ensures the solution won’t discolor your paint or damage your wallpaper. It’s a simple step that can save you from a much bigger headache later on.
Step 3: Remove Loose Soot First
Before you even think about mixing a cleaning solution, you have to deal with the loose soot clinging to your walls. This is the most important step because if you add moisture too soon, you’ll smear the oily soot and turn a manageable cleanup into a permanent stain. Your best tool for this job is a dry-cleaning sponge, also known as a soot sponge. Made from vulcanized natural rubber, it’s specifically designed to lift fine, dry particles without scrubbing. This initial dry pass is essential because it prevents the tiny, harmful particles from getting pushed deeper into the paint or released into the air you breathe.
To use a dry-cleaning sponge effectively, apply gentle pressure and wipe in a single direction using straight, parallel strokes. Overlapping your strokes slightly will help you cover the area evenly. As the sponge gets covered in soot, don’t just flip it over. Instead, use a utility knife to carefully slice off the dirty layer, revealing a fresh surface to continue cleaning. This method ensures you’re always lifting soot, not just moving it around. It’s a critical first step in any professional fire and smoke damage cleanup, guaranteeing a cleaner final result.
The Correct Way to Vacuum Soot
If you don’t have a soot sponge on hand, a vacuum cleaner with a soft brush attachment is your next best option for removing that initial layer of dust-like soot. The key here is to be extremely gentle. Hold the brush attachment just slightly off the wall’s surface and let the suction do all the work. Avoid pressing the brush against the wall at all costs, as this will rub the soot in and make the stain much worse. The goal is simply to lift the loose particles away, not to scrub them off. By effectively removing the loose soot first, you set the stage for a much more successful cleaning process and minimize the risk of spreading harmful particles throughout your home.
Step 3: Clean From the Top Down
Start by removing loose soot without touching the wall. Use a vacuum with a dusting brush attachment, holding it about half an inch from the surface. Next, grab a dry-cleaning sponge and wipe the wall in straight, parallel strokes from top to bottom. For stubborn stains, use a wet solution like a mix of degreasing dish soap and warm water. Always wash from the top down to prevent streaks.
Step 4: Prime and Prep After Cleaning
After cleaning, you might still notice faint stains or a smoky smell. If you plan to repaint, don’t just cover it up. You’ll need to apply a high-quality, stain-blocking primer first. This seals the surface, trapping any residual stains and odors so they don’t bleed through your new paint. This step ensures a truly clean finish. If the task still feels overwhelming, it might be time to contact a professional for help.
Using a Stain-Blocking Primer Before Repainting
If you’re planning to repaint after cleaning up soot, this next step is one you absolutely can’t skip: using a stain-blocking primer. It might be tempting to just grab your favorite paint color and get to work, but soot stains are incredibly stubborn and will almost certainly bleed through regular paint, even after several coats. A high-quality, stain-blocking primer acts as a seal, creating a barrier that traps any lingering residue and, crucially, locks in that smoky odor. This is a critical part of any successful smoke damage restoration project. Taking the time to prime properly ensures your new paint job looks fresh and clean, and it prevents those frustrating stains from reappearing down the road.
How to Clean Soot from Different Wall Types
Soot doesn’t treat all surfaces the same, so your cleaning method shouldn’t be one-size-fits-all either. The material and texture of your walls will determine the best approach for getting them clean without causing more damage. Whether you’re dealing with smooth paint, delicate wallpaper, or a textured surface, a little know-how can make all the difference. If the job feels too big or you’re worried about making things worse, remember that professional fire and smoke damage restoration is always an option. But if you’re ready to tackle it yourself, here’s how to handle three common wall types.
Cleaning Soot from Painted Walls
For painted walls, your first move is to gently lift away loose soot with a dry-cleaning sponge, sometimes called a soot sponge. This is a crucial first step because it removes the surface-level grime without smearing it into the paint. Once you’ve gone over the area, you can follow up with a wet cleaning solution. A mix of mild dish soap and water often does the trick, but for tougher stains, a Trisodium Phosphate (TSP) solution can be very effective. Just be sure to wear gloves and follow the mixing directions carefully. Always clean from the top down to prevent dirty drips from creating new streaks.
The Challenge of Cleaning Matte or Flat Paint
Matte or flat paint finishes are popular for their soft, modern look, but that beauty comes with a major drawback: they are notoriously difficult to clean. Unlike glossier paints that have a protective, sealed surface, matte paint is porous. This texture is what gives it a non-reflective finish, but it also means soot and grime can get trapped in its surface. If you try to scrub it, you risk burnishing the paint, which creates an ugly shiny spot that’s just as noticeable as the original stain. Using the wrong cleaner or too much pressure can even wipe the paint right off the wall. For this reason, you have to be extra gentle. Always start with a dry-cleaning sponge to lift as much soot as possible. If a stain remains, you can try dabbing it with a soft cloth barely dampened with water and a drop of mild soap, but as many painting experts advise, repainting is often the simplest and most effective solution for stubborn stains on a flat finish.
Safely Removing Soot from Wallpaper
Wallpaper requires a much more delicate touch than painted walls. Start with a dry sponge made of natural rubber to carefully wipe away the soot. These sponges are great at picking up fine particles without damaging the paper. If stains remain after your first pass, you can try a DIY paste. Mix a tablespoon of baking soda with just enough water to form a paste, then gently apply it to the stain. Use a soft cloth to lightly scrub the area, being careful not to tear or oversaturate the wallpaper. The key here is patience and a gentle hand to preserve your wall covering.
Tips for Cleaning Textured Walls
Textured walls, like those with a popcorn or knockdown finish, can trap soot in their nooks and crannies. A vacuum with a soft brush attachment is your best tool for the initial cleanup. Hold the brush about half an inch from the wall to suck up the loose soot without pressing it into the texture. If stains persist, you can move on to a wet cleaning solution like TSP and water. Use a cellulose sponge, dip it in your cleaner, and wring it out thoroughly until it’s just damp. Work from the top of the wall down to avoid streaking and ensure you get a clean finish.
How to Clean Soot from Other Household Surfaces
Soot doesn’t stop at your walls. Those fine, oily particles can settle on just about everything in your home, from your wooden coffee table to your favorite ceramic vase. Cleaning these items requires a careful touch, as the wrong method can cause permanent damage, like scratching a finish or setting a stain for good. Each material has its own set of rules, and knowing the right approach is key to successfully restoring your belongings. Before you start, always remember to wear protective gear like gloves and a mask to keep yourself safe from inhaling any harmful particles.
For minor soot exposure, like from a few candles, you can often handle the cleanup yourself with the right techniques. However, if your home has experienced significant smoke or fire damage, the soot will be widespread and more corrosive. In these situations, attempting to clean everything on your own can be overwhelming and often ineffective. A professional fire damage restoration service has the specialized tools and expertise to safely clean a wide variety of materials and completely remove lingering odors, ensuring your home is truly clean and safe.
Cleaning Soot from Wood Furniture
Wood furniture needs a gentle approach to avoid damaging the finish. Start by vacuuming any loose soot with a soft brush attachment, being careful not to press the particles into the wood grain. Next, you’ll want to use a solvent that can cut through the grease without harming the surface. Lightly dampen a soft cotton cloth with mineral spirits—the cloth should be barely wet. Gently wipe the soot away, working in small sections and switching to a clean part of the cloth often. Once the soot is gone, follow up by buffing the area with a separate clean, dry cloth to restore its shine. Always test this method on a small, hidden spot first.
Cleaning Soot from Metal and Glass
Non-porous surfaces like metal and glass are generally easier to clean. You can typically wash these items with a simple solution of warm water and a mild, degreasing dish soap. Use a soft sponge or cloth to gently scrub away the soot, then rinse the item thoroughly with clean water to remove any soap residue. To prevent water spots and ensure the surface is completely dry, which is especially important for metal that could rust, do a final rinse with denatured alcohol. Simply wipe it on with a clean cloth and let it evaporate for a streak-free finish.
Cleaning Soot from Ceramics
When it comes to ceramics, the right cleaning method depends on the type of finish. High-fired, glazed pieces like porcelain or stoneware are non-porous and can be cleaned just like glass and metal. However, you need to be extremely careful with low-fired or unglazed ceramics, such as terracotta or earthenware, as these materials are porous and can absorb the soot and cleaning solution, leading to permanent staining. For these more delicate items, it’s best to avoid DIY cleaning and consult a specialist. Trying to clean them yourself could cause irreversible damage, making professional assessment the safest route.
Common Soot-Cleaning Mistakes to Avoid
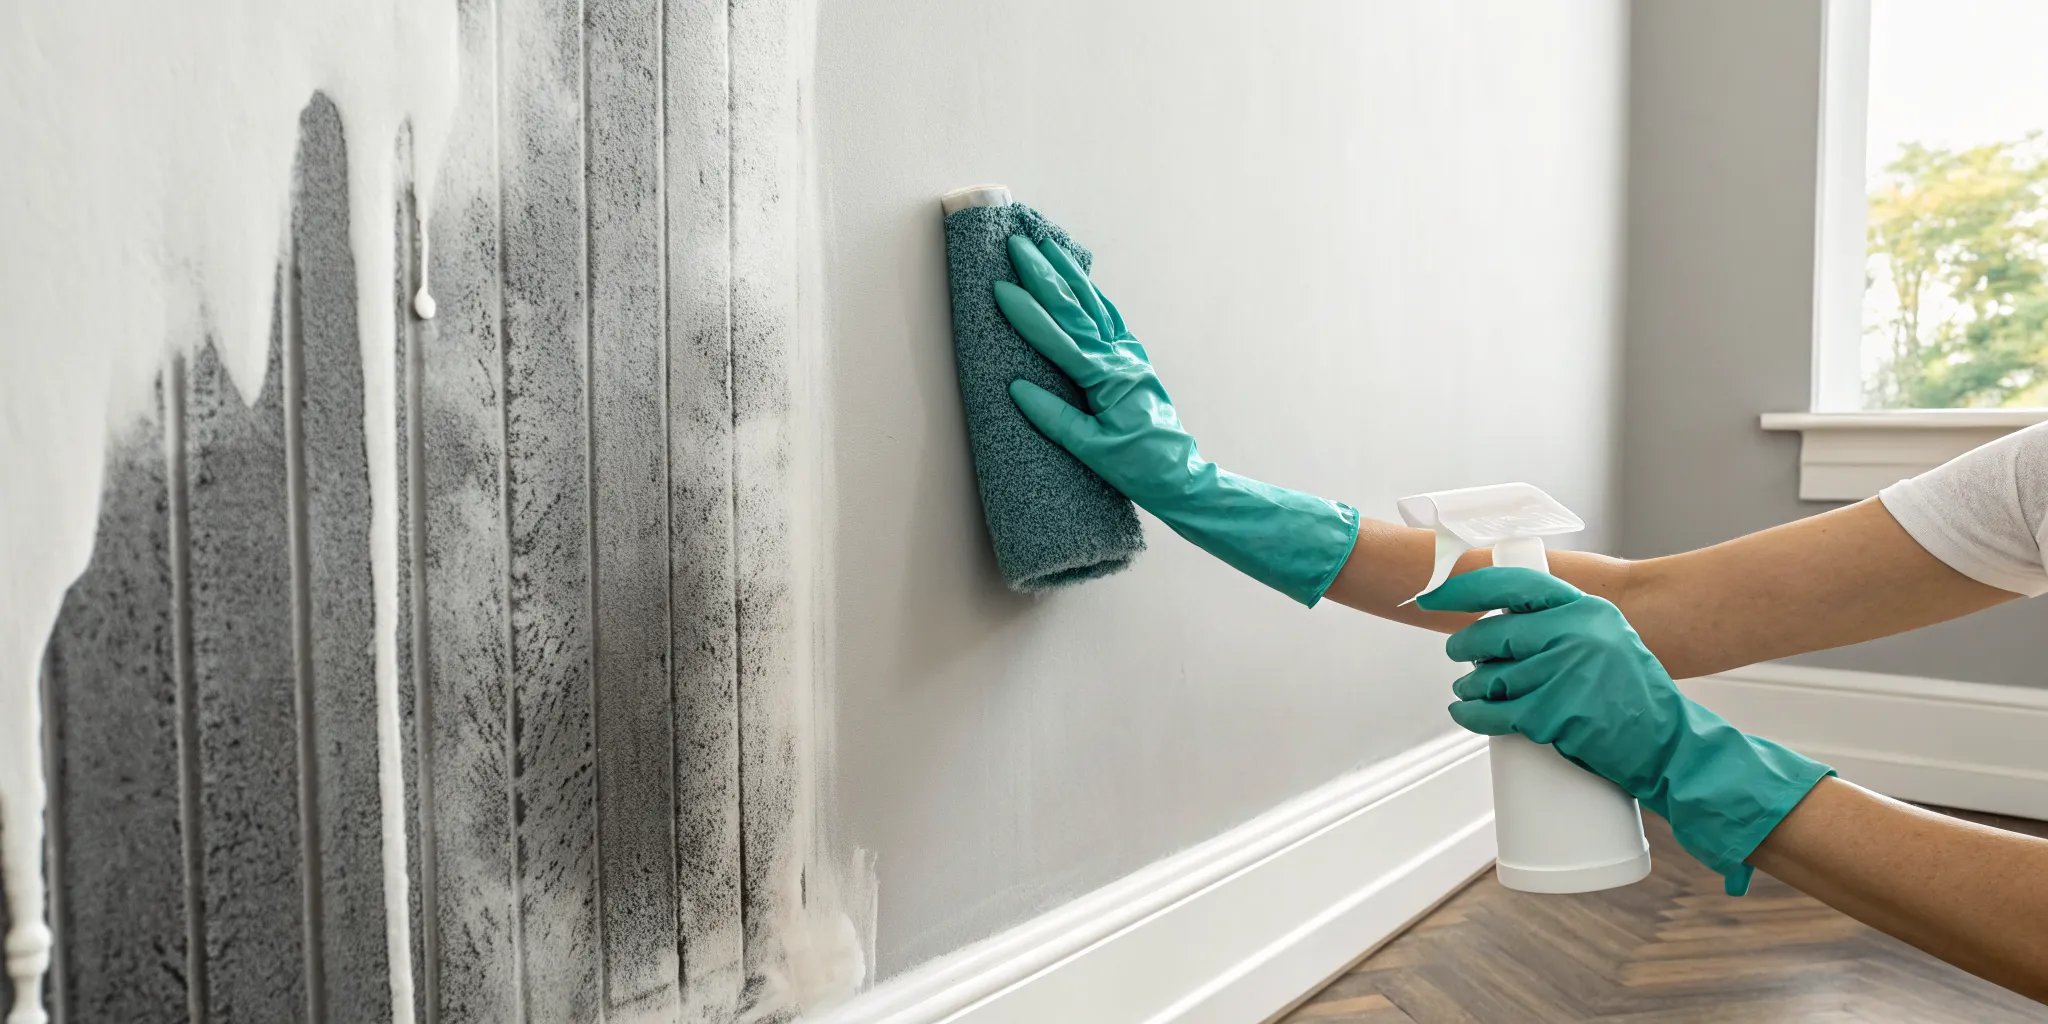
When you see soot on your walls, your first instinct might be to grab a wet cloth and start scrubbing. But hold on, some of the most common cleaning methods can actually make the problem worse. Knowing what to avoid is just as crucial as knowing the right steps to take. A simple mistake can turn a manageable cleanup into a much bigger, more stubborn mess. Let’s walk through the most frequent missteps so you can get your walls clean without any extra frustration.
Mistake #1: Using Water Before Dry Cleaning
It feels natural to use water to clean just about anything, but with soot, it’s a major mistake. Soot is an oily, fine particle, and adding water right away will only smear it across the surface, creating a bigger, darker stain that’s much harder to remove. Think of it like trying to clean up an oil spill with water; it just spreads the mess. Always start with a dry method. A dry-cleaning sponge, sometimes called a chemical or soot sponge, is designed to lift the loose soot particles off the wall without moisture. Only after you’ve removed as much dry soot as possible should you consider using a liquid cleaner.
Mistake #2: Scrubbing Instead of Dabbing
Your instinct might be to apply some elbow grease and scrub the soot away, but this will only embed the fine particles deeper into the paint or wallpaper. Aggressive scrubbing grinds the soot into the wall’s pores, making the stain semi-permanent. The key is to use gentle, deliberate motions. Avoid touching the soot-covered area with your bare hands, as the oils from your skin can also cause smearing. Always start cleaning from the top of the wall and work your way down. This prevents loosened soot from falling and creating new streaks on areas you’ve already cleaned.
Mistake #3: Forgetting Your Safety Gear
Cleaning soot isn’t just about making your walls look good; it’s also about protecting your health. Soot particles are tiny and can contain harmful carbon and other chemicals that you shouldn’t breathe in. Before you start, always put on safety glasses, a mask, and rubber gloves. It’s also a good idea to wear old clothes you don’t mind getting dirty. And remember the spot test we talked about earlier? Never skip it. Applying a cleaner to a small, hidden area first ensures it won’t damage your paint or wallpaper, saving you from a potential disaster.
Mistake #4: Ignoring the Lingering Odor
Even after you’ve successfully removed the visible soot stains, a smoky odor can linger in the room. This is because the smell penetrates porous surfaces like drywall and wood. Simply cleaning the surface won’t get rid of the smell completely. If the odor persists, you may need to seal the wall with a good stain-blocking primer before repainting. For stubborn or widespread odors, the problem might be deeper than the surface. This is often a sign that professional fire and smoke damage restoration is needed to fully deodorize your home and address any hidden issues.
DIY Odor Removal for Small Items
Smoke odor doesn’t just stick to walls; it can permeate smaller items throughout your home. For things like washable curtains or blankets, adding a cup of white vinegar to your laundry cycle can help neutralize the smell. For non-porous items like glass or ceramics, a simple soak in a solution of warm water and degreasing dish soap can work wonders. You can also place an open box of baking soda inside enclosed spaces like cabinets or drawers to absorb lingering odors. These methods are great for minor smoke smells, but if the odor is widespread and persistent, it’s a sign that the smoke particles have penetrated deeper into your home’s structure.
Mistake #5: Using Abrasive Cleaners Like Magic Erasers
When you’re faced with a stubborn stain, it’s tempting to reach for something powerful like a Magic Eraser. But for soot, this is one of the worst things you can do. These types of cleaners are abrasive and act like very fine sandpaper. Instead of lifting the soot, they will grind the oily particles deeper into the pores of your wall, potentially making the stain permanent. This is why gentle, non-abrasive methods are so important. If you’ve already used a dry sponge and a mild degreaser and the stain won’t budge, aggressive scrubbing isn’t the answer. It’s a clear sign that the soot has penetrated the surface, and you may need professional fire damage restoration to remove it without damaging your walls.
How to Keep Soot from Coming Back
After you’ve put in the effort to clean soot off your walls, the last thing you want is for it to return. Preventing soot is all about being proactive and addressing the conditions that allow it to form in the first place. Think of it as shifting from cleanup mode to maintenance mode. By focusing on a few key areas, you can keep your walls clean and your indoor air quality healthy for the long haul.
The three pillars of soot prevention are improving your home’s ventilation, keeping up with regular maintenance on appliances, and getting to the root cause of the problem. A little bit of attention in these areas can make a huge difference. It stops soot from accumulating and can even alert you to bigger issues, like a malfunctioning furnace or chimney blockage, before they become serious hazards. If you find that soot keeps returning despite your best efforts, it might be a sign of a more complex issue related to previous fire and smoke damage that needs a professional eye.
Check and Improve Your Home’s Ventilation
Good airflow is your best friend in the fight against soot. When air circulates freely, it helps disperse airborne particles before they have a chance to settle and stain your walls. The easiest way to do this is by opening windows and using fans to keep fresh air moving through your home, especially when you’re using candles or cooking.
Don’t forget about your home’s built-in systems. Use the exhaust fan in your kitchen when you cook and in the bathroom when you shower. It’s also a good idea to check your HVAC system’s filter regularly and change it as needed. A clean filter not only improves air quality but also helps your system run more efficiently. According to home experts at The Spruce, even simple acts like ventilating a room can significantly reduce soot buildup.
Schedule Regular Appliance Maintenance
Many common sources of soot are appliances that we use every day. That’s why regular maintenance is non-negotiable. If you have a fireplace, make sure it’s inspected and cleaned by a professional annually. A properly vented and maintained fireplace will burn fuel more completely, producing far less soot. The same goes for your furnace, water heater, and any other fuel-burning appliances.
Schedule annual service appointments for your heating system to ensure it’s functioning safely and efficiently. This simple step not only prevents soot from coating your walls but also protects your family from potential carbon monoxide exposure. Keeping up with this routine maintenance is one of the most effective ways to prevent a small issue from turning into a major disaster recovery situation.
Find and Fix the Source of the Soot
To truly stop soot for good, you need to identify where it’s coming from. Soot is the byproduct of incomplete combustion, which means something in your home isn’t burning fuel cleanly. Common culprits include frequently burning low-quality candles with long wicks, a poorly maintained fireplace, or a malfunctioning heating appliance. Take a look around your home and try to pinpoint the source.
Are the soot stains concentrated in one area, like above a specific candle or near a heating vent? Even something as simple as a candle burning too quickly can release a surprising amount of soot into the air. Once you find the source, you can take action, whether that means trimming candle wicks, switching to flameless candles, or calling a professional to service an appliance.
When Is It Time to Call a Professional?
While tackling soot stains on your own can be satisfying, some situations are best left to the experts. Knowing when to put down the sponge and pick up the phone can save you time, prevent further damage, and protect your health. If you’re standing in front of a wall that looks more like a fireplace than a feature, it’s probably a sign.
Professional restoration isn’t just about cleaning; it’s about safely and completely returning your home to its previous condition. If the soot is the result of a fire, even a small one, there are often hidden damages and risks that a DIY cleaning can’t address. Let’s walk through a few clear signs that it’s time to call for backup.
When the Soot Damage Is Widespread
A few candle marks are one thing, but soot covering entire walls, ceilings, or multiple rooms is a different challenge altogether. When you’re dealing with extensive damage, it’s easy to make the problem worse with improper cleaning methods. Rubbing a wet cloth on a large, soot-covered wall can smear the fine particles, pushing them deeper into the paint and drywall. This not only creates a bigger mess but can also lead to permanent staining.
A professional fire and smoke damage restoration team has the training and equipment to handle large-scale cleanups efficiently. We know how to contain the mess and systematically remove soot without causing additional harm to your property.
When You Have Health Concerns or a Stubborn Odor
Your health should always be the top priority. Soot contains fine carbon particles that can be harmful when inhaled, especially for children, older adults, or anyone with respiratory issues. On top of that, many powerful cleaning chemicals release strong fumes. If you’re facing a large amount of soot from a house fire or another smoky event, it’s safer to let a professional remediation expert handle the cleanup.
A persistent smoky smell is another red flag. That odor means soot particles are still lingering in the air or trapped in porous materials like carpets, upholstery, and even your HVAC system. Professionals use specialized equipment like air scrubbers and thermal foggers to neutralize odors at the source.
When Your DIY Cleaning Isn’t Cutting It
You’ve followed all the steps. You used a dry-cleaning sponge, tried a gentle cleaning solution, and the stain is still there. Don’t feel defeated; some soot stains are incredibly stubborn. They can penetrate deep into surfaces, making them nearly impossible to remove without specialized equipment and professional-grade cleaners.
Instead of reaching for harsher chemicals that could damage your walls, this is the perfect time to call for help. A professional team can assess the stain and determine the right approach. Sometimes, the solution isn’t just more scrubbing but a different technique entirely, ensuring the soot is lifted without stripping paint or ruining your wallpaper.
When Soot Is Hidden in Hard-to-Reach Places
Soot is incredibly sneaky. It doesn’t just settle on open walls; its fine particles travel through the air and find their way into hidden nooks like air ducts, wall cavities, and attics. This hidden residue is often the source of a persistent smoky odor that lingers long after you’ve cleaned the visible surfaces. More importantly, it can continuously circulate harmful particles throughout your home every time your HVAC system kicks on, compromising your indoor air quality and posing a risk to your family’s health.
The biggest problem with hidden soot is that you can’t clean what you can’t see. Those tiny black particles are small enough to be inhaled, which can lead to respiratory irritation. A professional team has the specialized equipment, like borescopes for inspection and HEPA vacuums for safe removal, to address contamination in these hard-to-reach areas. Tackling hidden soot is a standard part of any thorough fire and smoke damage restoration, ensuring that your home isn’t just visibly clean but also safe to breathe in again.
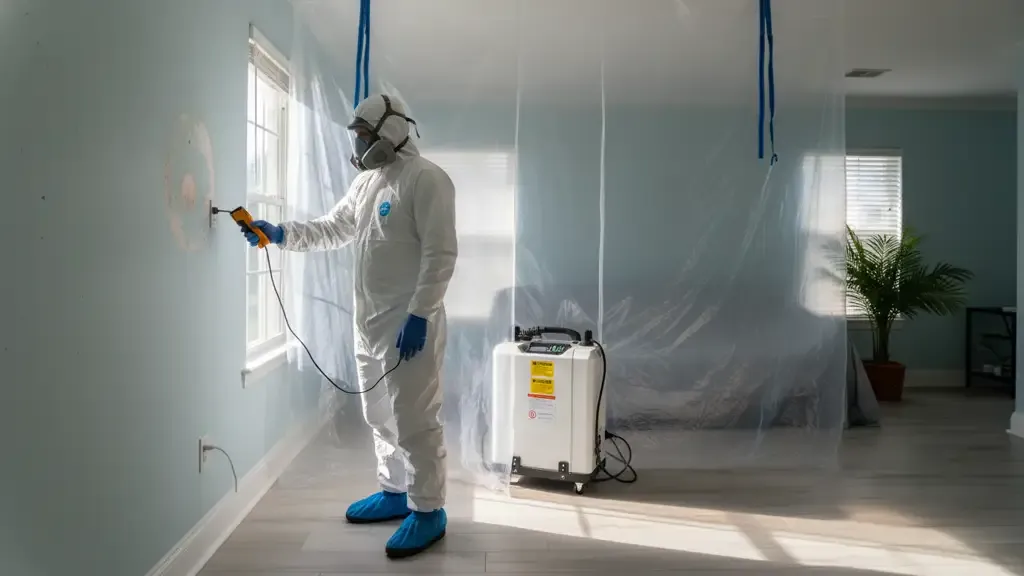
How Go Time Restoration Makes Soot Removal Easy
When you call our team, you’re getting more than just a cleaning service. We bring the right tools, industry-approved solutions, and years of experience to every job. Our goal is to handle the entire disaster recovery process for you, from the initial assessment to the final touches that make your house feel like home again. We effectively remove soot, eliminate smoky odors, and restore your walls to their original condition.
We understand how stressful property damage can be. Letting a professional team take over gives you peace of mind that the job will be done safely, correctly, and completely, so you can focus on getting things back to normal.
What to Expect from a Professional Restoration Service
When you decide to call in a professional, you’re handing over a stressful situation to an expert. Knowing what to expect can make the process feel much more manageable. A true professional service doesn’t just clean up the mess; they provide a clear, comprehensive plan to get your home back to normal.
Expect a Fast and Thorough Assessment
The moment a restoration team arrives, their first priority is to assess the damage and prevent it from getting worse. Soot can spread easily, so a quick and effective response is key. Professionals are trained to contain the affected area to stop particles from settling on other surfaces. They understand the urgency and are equipped to handle disaster recovery with speed and precision. This immediate action is crucial for protecting your home and belongings from further harm and sets the stage for a successful cleanup.
They’ll Use Professional Tools and Techniques
Professionals come prepared with specialized equipment and cleaning agents that you won’t find at your local hardware store. They use tools like dry-cleaning sponges, also known as soot sponges, which are designed to lift soot off walls without smearing it. For tougher stains, they may use powerful, industry-approved chemical solutions. This expertise in fire and smoke damage restoration ensures the job is done correctly and safely, avoiding the common mistake of using water too early, which can make the soot stain permanently.
Advanced Odor Removal Technology
Even after the walls look clean, a smoky smell can stick around. This happens because microscopic soot and smoke particles get trapped deep inside porous materials like drywall, carpet, and even your ventilation system. This is where professional technology makes a huge difference. We use tools like HEPA air scrubbers to pull those lingering particles right out of the air. For really stubborn smells, we use thermal foggers. This equipment creates a fine mist that follows the same path the smoke did, neutralizing odor-causing particles at their source. It’s a comprehensive approach that ensures the smell is gone for good, not just covered up.
You’ll Get a Clear Plan for Full Restoration
A professional service goes beyond surface cleaning. The team will create a detailed plan to restore your property completely. This includes deep cleaning to remove all traces of soot, but it also involves eliminating that lingering smoky odor from the air and from porous materials like carpets and furniture. They will assess what can be salvaged and what needs to be replaced, handling everything with care. Their goal is to return your home to its pre-damage condition, making it a safe and comfortable space for you again.
Assistance with Insurance Documentation
Dealing with property damage is stressful enough without adding insurance paperwork to the mix. A professional restoration team can be a huge help here. They know exactly what insurance adjusters need to see and will meticulously document the damage for your claim, using detailed photos and reports. This professional documentation ensures that nothing gets overlooked, from the obvious soot on the walls to less visible smoke damage that could be hiding in your HVAC system. Having an expert handle this part of the process not only strengthens your claim but also frees you up to focus on your family, turning a complicated process into a much more manageable one.
Related Articles
- Hidden Fire & Smoke Dangers in Pinellas County | Go Time
- Fire Damage Restoration Safety in Pinellas County | GoTime
Frequently Asked Questions
Can I just paint over the soot stains? Painting directly over soot is a common mistake that almost always leads to frustration. Soot is oily and will eventually bleed through layers of new paint, causing yellow or gray stains to reappear. To get a lasting finish, you must thoroughly clean the surface first. After cleaning, you should apply a high-quality, stain-blocking primer designed to seal any remaining residue and odors before you even think about picking up a paintbrush.
Is a little bit of soot from a candle really that bad for me? While a tiny amount of soot from a single candle isn’t an emergency, it’s not harmless either. Those fine black particles can be inhaled and irritate your respiratory system, which is a particular concern for people with asthma or allergies. Think of it as an air quality issue. Consistently seeing soot, even from a small source, means you’re breathing in those particles regularly, so it’s best to address the source and clean it up properly.
What makes a dry-cleaning sponge so special for cleaning soot? A dry-cleaning sponge, or soot sponge, is made of vulcanized natural rubber that has a unique quality: it’s incredibly porous and acts almost like a magnet for fine, dry particles like soot. Unlike a regular household sponge that would just smear the oily residue, a soot sponge lifts and traps the particles without using any water. This is why it’s the essential first step before you introduce any liquid cleaners to the wall.
I cleaned the walls, but my house still smells like smoke. What now? A lingering smoke smell is a sign that soot particles have penetrated porous surfaces beyond your walls, such as carpets, furniture, or even your home’s ventilation system. Simply cleaning the visible stains won’t eliminate the odor. You can try airing out the house and using a stain-blocking primer before repainting, but for a persistent smell, you likely need professional deodorizing treatments to neutralize the odor at its source.
How do I know if my soot problem is too big for me to handle myself? A good rule of thumb is to consider the source and the scale. If the soot is from a small, isolated incident like a few candles and is confined to a small area, you can likely handle it. However, if the soot covers an entire room, is the result of a furnace puffback, or is from any kind of house fire, it’s time to call a professional. Widespread damage and persistent odors require specialized equipment and expertise to ensure your home is cleaned safely and completely.